


Carlos Dorelli
-
Posts
83 -
Joined
-
Last visited
-
Days Won
8
Content Type
Profiles
Forums
Events
Downloads
Posts posted by Carlos Dorelli
-
-
Oh, this topic is really funny.
I prefer to pay, it's a really good service and I like the support.
The quality is good asf.
0 -
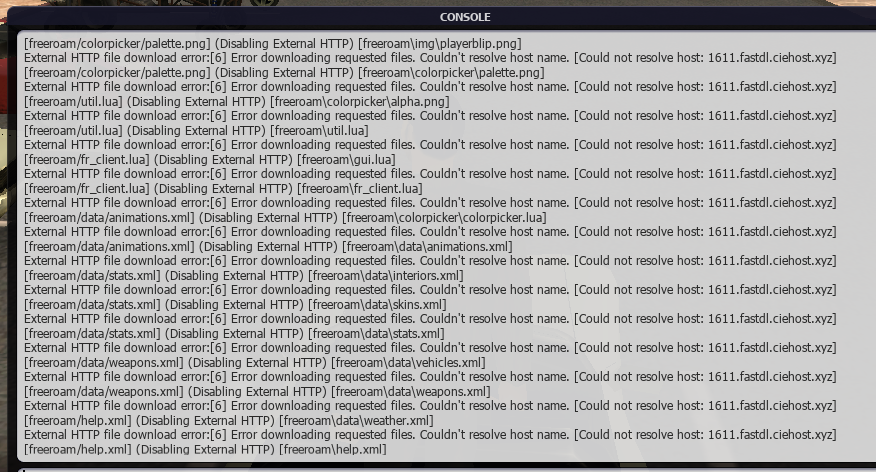
Remember to open the firewall port and disable the proxy in CloudFlare. Did it twice today and both worked.
1 -
Anyway, if you need help just ask for it on Discord (Deleted User 08246b21#6924)
0 -
On 1/5/2022 at 12:55 AM, SaphireL said:
hello good night, i used nginx tutorial and i have not had success besides the download is slow and it is not compressing it is returning this error in the webconsole
I need an urgent solution plis-
error returning in webconsole

tutorial topic used:
Of course the tutorial won't work if you are doing something wrong... I re-tested yesterday and it's everything okay with it
 0
0 -
error returning in webconsole
-
https://forum.mtasa.com/topic/86104-nginx-problem-with-fast-download/
+
The code in the tutorial is for Windows, you will need to adapt it. I also recommend use another web server. Just make a good configuration that everything will work well. Or just wait for day one of 2022 that a lot of new tutorials will be released here and in my channel.
0 -
To have the same Client Area you need to buy WHMCS then integrate TCAdmin Module with it.
- WHMCS ~> https://whmcs.com/
- How to Integrate the module ~> https://help.tcadmin.com/TCAdmin2_advanced_module_for_WHMCS
0 -
-
-
I'm not going to work with gamehosting anymore so I'm leaving some content on a youtube channel related to it.
I'm posting some TCAdmin tutorials that for most of the users here probably it's not useful but I hope it help someone any day.
Oops: I'm finishing the subtitles to english.
1. How to install the panel
https://youtu.be/wgSFvKlOYR02. Configure the TCAdmin website to run with IIS
https://youtu.be/MJVULliGlh8Every new video related to the panel I will update the topic here.
Have fun
 2
2 -
On 6/23/2020 at 3:35 AM, Dennis said:
Are you using MVC or the old design for TCAdmin?
How can we change MVC icons?
0 -
Hello,
I've posted a time ago here on TCAdmin forum in the section of Tips & Tricks for 2.0 a script that allow FastDL for Multi Theft Auto using nginx. This script is exclusivelly for Windows at the moment but I'm working to bring it to Linux.
I'm new to Linux on TCAdmin and nginx so I'm looking for someone with good experience that can help me with it.
My Discord: Eldremor#9214
0 -
Hello,
I'm new at using TCAdmin on Linux and I tried to install phpMyAdmin on nginx but something went wrong

I've installed the phpMyAdmin and added the file include snippets/phpmyadmin.conf; as a include in my nginx default.conf.
upstream tcadmin-fcgi {
        ip_hash;
        server unix:/home/tcadmin/Temp/fastcgi-socket-1;
        keepalive 32;
}

upstream tcadmin-fcgi-mvc {
        ip_hash;
        server unix:/home/tcadmin/Temp/fastcgi-socket-mvc-1;
        keepalive 32;
}

server {
        #the following line is required if you want to configure with Let's Encrypt
        server_name ryzen.timberhost.com.br;
        fastcgi_temp_path /home/tcadmin/Temp 1 2;
        client_body_temp_path /home/tcadmin/Temp 1 2;
        #access_log   /home/tcadmin/Logs/nginx.log;
        root /home/tcadmin/ControlPanel.MVC;
        index index.html index.htm default.aspx Default.aspx;
        include snippets/phpmyadmin.conf;

        #Support for Let's encrypt tools
        location /.well-known {
               try_files $uri $uri/ =404;
        }

        #Everything else served by fastcgi server
        location / {
               root /home/tcadmin/ControlPanel.MVC;
               fastcgi_ignore_client_abort on;
               fastcgi_pass tcadmin-fcgi-mvc;
               include fastcgi_params;
               fastcgi_split_path_info ^(.+\.as[pmh]x)(.*)$;
               fastcgi_param PATH_INFO $fastcgi_path_info;
               fastcgi_param  SCRIPT_FILENAME    $document_root$fastcgi_script_name;
               fastcgi_keep_conn on;
               fastcgi_buffering off;
               fastcgi_read_timeout 600s;
               gzip            on;
               client_max_body_size 100m;
       }

        #Everything else served by fastcgi server
        location /Aspx {
               root /home/tcadmin/ControlPanel;
               fastcgi_ignore_client_abort on;
               fastcgi_index Default.aspx;
               fastcgi_pass tcadmin-fcgi;
               include fastcgi_params;
               fastcgi_split_path_info ^(.+\.as[pmh]x)(.*)$;
               fastcgi_param PATH_INFO $fastcgi_path_info;
               fastcgi_param  SCRIPT_FILENAME    $document_root$fastcgi_script_name;
               fastcgi_keep_conn on;
               fastcgi_buffering off;
               fastcgi_read_timeout 600s;
               gzip            off;
               client_max_body_size 100m;
       }

    listen 443 ssl; # managed by Certbot
    ssl_certificate /etc/letsencrypt/live/ryzen.timberhost.com.br/fullchain.pem; # managed by Certbot
    ssl_certificate_key /etc/letsencrypt/live/ryzen.timberhost.com.br/privkey.pem; # managed by Certbot
    include /etc/letsencrypt/options-ssl-nginx.conf; # managed by Certbot
    ssl_dhparam /etc/letsencrypt/ssl-dhparams.pem; # managed by Certbot

}


server {
    if ($host = ryzen.timberhost.com.br) {
        return 301 https://$host$request_uri;
    } # managed by Certbot


        server_name ryzen.timberhost.com.br;
        listen   80;
    return 404; # managed by Certbot


}
The file phpmyadmin.conf contains this code:
location /phpmyadmin {
    root /usr/share/;
    index index.php index.html index.htm;
    location ~ ^/phpmyadmin/(.+\.php)$ {
        try_files $uri =404;
        root /usr/share/;
        fastcgi_pass unix:/run/php/php7.2-fpm.sock;
        fastcgi_index index.php;
        fastcgi_param SCRIPT_FILENAME $document_root$fastcgi_script_name;
        include /etc/nginx/fastcgi_params;
    }

    location ~* ^/phpmyadmin/(.+\.(jpg|jpeg|gif|css|png|js|ico|html|xml|txt))$ {
        root /usr/share/;
    }
}
The error I'm getting is the "502 Bad Gateway".
Does someone have any idea of how to fix it? Linux is not my thing... yet!
0 -
-
4 hours ago, SHAD0WRAIDERZA said:
Are you editing the default.conf or did you make a new one? make sure it is pointing to the correct document root. nginx default is /var/www/html
I'm editing the default.conf
0 -
19 hours ago, Dennis said:
I think nginx will throw a 404 if there's no index file by default (since Directory Index is disabled). You're still able to access the files directly by using the complete link to the file.
You could enable Directory Index by adding this to your location block:
location /fastdldir/ {
    autoindex on;
}
Thanks for the reply. I did it but still getting error 404 on nginx.
#Remover erro 404 no link do FastDL
location /home/tcadmin/tcafiles/fastdownloads/ {
	autoindex on;
}
0 -
Hi guys,
I have TCAdmin installed in Ubuntu 18.04 using nginx and I'm getting nginx error 404 when I try to access the FastDL link. Any idea of how to solve it?
0 -
If you need the MTA Download compacter + acellerator just add me on Discord, it's Eldremor#0001.
0 -
Hello, I'm here today to share a script very helpful that I've been using for years on my company. This script uses nginx to make the download easier and faster to Multi Theft Auto servers and it's totally automated to TCAdmin. This help a lot of people like me that the internet is horrible (really horrible) to download faster the server mods and be happy playing on it

Watch it working
Prerequisites
- Have nginx installed on the machine (I'm using port 8080 but you can use any other if you want. Just make sure to change the ports on the script).
- Have a domain on CloudFlare (we are going to use it to add a DNS redirect to the machine IP. Without it won't work anyway).
- Have a Multi Theft Auto Game Config (if you don't just download this one that already have the scripts. The credits of it goes to @LFA, I've just added the scripts on it. Don't forget to change with your domain and ports).
Installation
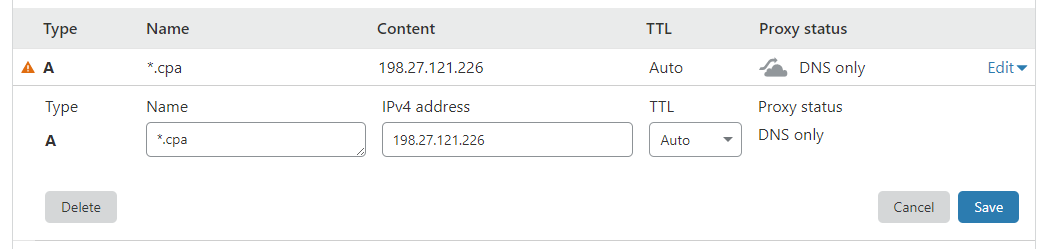
CloudFlare- Log in on CloudFlare
- Select the domain you want to use it
- Go to DNS
-
And add a Record A pointing to your machine IP keeping the Proxy Status as "DNS Only"
- Save
Adding and modifying the scripts
- Go to Settings > Games & Other Voice Servers > Multi Theft Auto (or the name of the game in your config) > Custom Scripts > New
-
FIRST SCRIPT | Operating System: Windows | Script Engine: Batch file/shell script | Event: After created | Description: Faster Download | Order: 0 | Check "Ignore execution errors"
cd C:\nginx\
echo server {  > "C:\nginx\conf\%ThisService_GameId%%ThisService_ServiceId%.conf"
echo         listen 8080;  >> "C:\nginx\conf\%ThisService_GameId%%ThisService_ServiceId%.conf"
echo         server_name %ThisService_GameId%%ThisService_ServiceId%.cpa.timberhost.com.br;  >> "C:\nginx\conf\%ThisService_GameId%%ThisService_ServiceId%.conf"
echo         location / {  >> "C:\nginx\conf\%ThisService_GameId%%ThisService_ServiceId%.conf"
echo         root "C:/TCAFiles/Users/%ThisService_UserNameLowerCase%/%ThisService_ServiceId%/mods/deathmatch/resource-cache/http-client-files/";  >> "C:\nginx\conf\%ThisService_GameId%%ThisService_ServiceId%.conf"
echo         autoindex on;  >> "C:\nginx\conf\%ThisService_GameId%%ThisService_ServiceId%.conf"
echo         }  >> "C:\nginx\conf\%ThisService_GameId%%ThisService_ServiceId%.conf"
echo } >> "C:\nginx\conf\%ThisService_GameId%%ThisService_ServiceId%.conf"
cd /nginx
taskkill /f /IM nginx.exe
start nginx

EXIT
Obs: 8080 is the port that will be used by nginx (change if you want to use another port). Change "cpa.timberhost.com.br" for "cpa.yourdomain.com" (the domain added on the CloudFlare before).
---
SECOND SCRIPT | Operating System: Windows | Script Engine: Batch file/shell script | Event: After deleted| Description: Delete Compacted Download | Order: 0 | Check "Ignore execution errors"
del /f /q C:\nginx\conf\%ThisService_GameId%%ThisService_ServiceId%.conf
---
THIRD SCRIPT | Operating System: Windows | Script Engine: Batch file/shell script | Event: Custom action | Description & Name: Faster & Compacted Download | Order: 0 | Check "Ignore execution errors" (this part you can configure as you want).
taskkill /f /IM nginx* del /f /q C:\nginx\conf\%ThisService_GameId%%ThisService_ServiceId%.conf cd C:\nginx\ echo server { > "C:\nginx\conf\%ThisService_GameId%%ThisService_ServiceId%.conf" echo listen 8080; >> "C:\nginx\conf\%ThisService_GameId%%ThisService_ServiceId%.conf" echo server_name %ThisService_GameId%%ThisService_ServiceId%.cpa.timberhost.com.br; >> "C:\nginx\conf\%ThisService_GameId%%ThisService_ServiceId%.conf" echo location / { >> "C:\nginx\conf\%ThisService_GameId%%ThisService_ServiceId%.conf" echo root "C:/TCAFiles/Users/%ThisService_UserNameLowerCase%/%ThisService_ServiceId%/mods/deathmatch/resource-cache/http-client-files/"; >> "C:\nginx\conf\%ThisService_GameId%%ThisService_ServiceId%.conf" echo autoindex on; >> "C:\nginx\conf\%ThisService_GameId%%ThisService_ServiceId%.conf" echo } >> "C:\nginx\conf\%ThisService_GameId%%ThisService_ServiceId%.conf" echo } >> "C:\nginx\conf\%ThisService_GameId%%ThisService_ServiceId%.conf" start nginx echo '%ThisService_GameId%%ThisService_ServiceId%.cpa.timberhost.com.br' -
Now go the Configuration Files > mtaserver.conf (if you don't have this file on it add because it's very important) > Template > In "<httpdownloadurl></httpdownloadurl>" and change by "<httpdownloadurl>http://$[Service.GameId]$[Service.ServiceId].yourdomain.com:YOURNGINXPORT</httpdownloadurl>". Now save and be happy

Final considerations
If this tutorial helped you please leave a like on the topic. If you have any problem and need help with it just contact me here on the comments or on Discord (Eldremor#0001).1 -
BROKE PROTOCOL: Online City RPG
First considerations
This config wasn't made only by me. The first steps of it came in June of 2019 when I asked for a Broke Protocol config here on the forum and @jungleNZ sent one. Today I've downloaded the config again and made some changes updating it with all the new features of Broke Protocol from nowadays.This is my first config so sorry if there is any problem on it. If you find something wrong or that can be changed to improve the config just comment below or DM me on Discord (Eldremor#0001).
I would like to thank again @LFA for helping me with the custom scripts part.
Prerequisites
- (Optional) Download BP-CoreLib.dll > Add the file to the default game server folder (named 'bp' on TCAFiles > Games)
- Allow ICMP Pings / Echo Requests on the firewall or the servers will show on the list with 1000ms.
Installation
- Download the config (at the moment only for Windows)
- Go to TCAdmin > System > Settings > Game & Other Voice Servers > Import > Then upload the file you downloaded
- Save the config and change anything if you want
- Before create a new Broke Protocol server make sure you have all the prerequisites.
Features
- All possible configuration files (announcements, groups, npc_names, server_info, settings, skins and whitelist)
- BPEssentials Plugin One Click Installation (If installed, new configuration files will show up - customcommands, localization and settings.json for BPEssentials)
- Now Server.log is working correctly
- Web Console (Working with Server.log)
- Steam Workshop Mods (One Click Install - no need to move the file)
- Steam Workshop Plugins (Yes, some plugins can be downloaded from the workshop)
-
Submitter
-
Submitted01/15/21
-
Category
1 -
-
26 minutes ago, numpty said:
Make sure the database information is correct
It is.
26 minutes ago, Alexr03 said:Also restart the monitor and service manager.
I did but service manager is not restarting. I get:
TCAdmin.SDK.Remote.RemoteException:  ---> System.Net.Sockets.SocketException: No connection could be made because the target machine actively refused it
Server stack trace:
   at System.Net.Sockets.Socket.DoConnect(EndPoint endPointSnapshot, SocketAddress socketAddress)
   at System.Net.Sockets.Socket.Connect(EndPoint remoteEP)
   at System.Runtime.Remoting.Channels.RemoteConnection.CreateNewSocket(EndPoint ipEndPoint)
   at System.Runtime.Remoting.Channels.SocketCache.GetSocket(String machinePortAndSid, Boolean openNew)
   at System.Runtime.Remoting.Channels.Tcp.TcpClientTransportSink.SendRequestWithRetry(IMessage msg, ITransportHeaders requestHeaders, Stream requestStream)
   at System.Runtime.Remoting.Channels.Tcp.TcpClientTransportSink.ProcessMessage(IMessage msg, ITransportHeaders requestHeaders, Stream requestStream, ITransportHeaders& responseHeaders, Stream& responseStream)
   at System.Runtime.Remoting.Channels.BinaryClientFormatterSink.SyncProcessMessage(IMessage msg)
Exception rethrown at [0]:
0 -
I'm getting that "No connection could be made because the target machine actively refused it 127.0.0.1:52408" when I try to start/restart or anything else in a service. How can I solve this?
0 -
Hello, I'm getting a problem with the plugin... When the user create the database show up that "Uh oh, something went wrong! Please contact an Administrator (see web console for details)!" like in the image below. Obs: the database is created in the MySql server but doesn't show on TCAdmin for the user.
0 -
10 minutes ago, numpty said:
Right click on the folder then go to properties. Then permission the add everyone to it and give them access it should work then. I had a similar issur
I did it but the problem persists.
0


.png.cb4d722cc72205e505720009889ab2bc.png)

Control Panel Domain Name Ending With Port?
in Windows Support
Posted
Hi, this will help you: https://docs.tcadmin.com/category/web-server-configurations
I have old videos following step by step in both operational systems. If you need, here it is: